How to do a mail shot / mail merge
There are version differences - these are highlighted NB version details
Consultants need to have permission to Mail Merge set (Maintenance> Users).
1. Select the records you wish to send the mail shot to.
- Open the Contacts Selector if you are mailing Company People; in the Company Selector you must click the Company People radio button and make a selection of people before starting a Mail Merge.
- Open the Person Selector if you are mailing Candidates.
Highlight any contacts you want to filter. In the below example I have highlighted one that I do not want to include in the mailer.
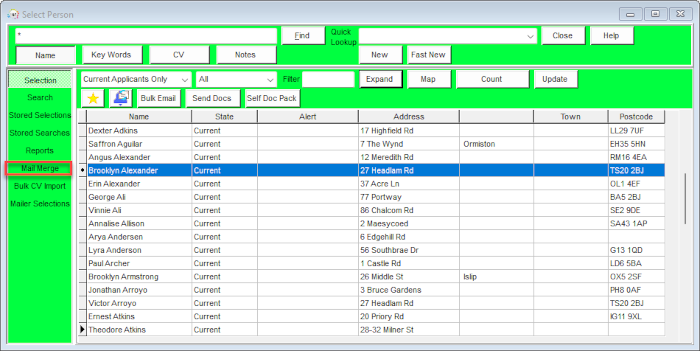
NB if you are using a version prior to 2.2.9.9 then you will then have to highlight and save the records that you want to send the mailer to into a stored selection, retrieve that stored selection and then continue. For versions 2.2.9.9 and after you can continue without saving the selection, just keeping those you wish to filter highlighted on the selector.
2. Select the Mail Merge Tab.
The Combo box will show the Logged in User and the table will show the list of saved merge documents that belong to that User. If you need to use a document linked to another User or Department select them from the Combo box.

3. Select the document to be used:
- Select existing document from the list in the table and click OPEN.
OR
- To make a New Mail Merge document click NEW. A list of letter templates is offered on which to base the mail merge or you can start from a blank document.
You will be asked to confirm who the signatory for the Mail Merge is.
4. NB. If using version 2.2.9.9 or above: if some records have been highlighted, you will then get a box asking you to select which records you wish to send the mail to – All, Only Highlighted or All Except Highlighted.

5. NB. If using version 2.2.10.1 or above: this box will also ask you to filter by marketing question – which records do you wish to send the mail to – contacts that are Subscribed to marketing, Unsubscribed to marketing or ALL. See Unsubscribing a contact from marketing

6. The document is opened.
Edit the document as required.
Further database fields can be inserted through File, Insert Fields. They must correspond to fields relevant to where the mail is being created (eg. progress fields will only be populated when the mail merge is created from the progress screen etc.). Inserted fields will appear as the data for the first selected recipient.
Use the video buttons to step through the letters to check for each recipient. The number will show which letter you are on.

7. Send the mailer.
If you are just printing letters to send then you can skip a and b and go straight to c.
- a) To send by E-mail click on the Enable E-mail button and complete the subject line and other details in the box.

NB Versions up to 2.2.9.13 only: When you click print, those enabled will be sent by the method selected; those without an email or fax address will be printed on paper. When creating your selection it is worth to include 'has email address' in the search criteria. NB Versions 2.2.9.13 onwards: if there are any records without an email address it will show how many records do not have an email address and a radio button for options - merge for all, only with email address or only without email address. If ALL or without email address are selected then those without email address will be printed.

- b) Once you have completed the email details click ok.
- c) The letters can now be sent by the selected method using the PRINT buttons – this will then send by email or fax if you have enabled them or straight to printer if you have not. The options are
- PRINT ALL - will send all letters.
- PRINT THIS ONE button – means you can send just one at a time and allow you to make further individual tailoring to the letters.
- PRINT TO END – will print from the current one you are viewing to the last one.
- d) It is not necessary to save the merged document when you close the form unless it will be used again in the future.
8. Contact events.
There are three options for whether contact events are made when doing a mail merge to contacts. This is set up by your agency according to requirements. See How to create a contact event from a Mail Merge.
9.Link to Applicant.
It is possible to attach the CV of one candidate to multiple client recipients, as in sending out speculative CVs. Use the Link to Candidate button to select the candidate.
When enabling the send out of the mailmerge by email tick the CV(s) box to attach the candidate’s CV to each letter.
When Contact Events is used each will also be linked to the Candidate. The Candidate will show in the Linked Column on the list of Contact Events in the Company record
Version 2.21.11+ to ensure users are searching correctly and only sending targeted mail merges by text or email it is possible to limit the number of emails/texts that can be sent in a single mail merge. If a user tries to send a mail merge or bulk text to more people than specified here they will get a message stating they have exceeded the limit.
Whilst the mail merge is running, if the User attempts to send any emails within Microsoft Outlook, there is a risk that the email(s) might be hijacked by Microsoft Outlook resulting in sending these emails to one or many of the recipient’s addresses on the mail merge list.
The error is not simply limited to emails, as a User working in Microsoft Word with a document, can find it too has been hijacked by Microsoft Outlook when sending out an attachment to an email.
We urge all Users to follow this guide when performing large mail merges.
1) When a mail merge is in progress, do not use Microsoft Outlook for anything else.
2) When attaching a document in Microsoft Word, close all instances of Microsoft Word and do not use until the mail merge has completed.
See also How to create a Contact Event from Mail Merges
Back to Online Users Guide
Back to Contact Management