The Notification system provides an alternative way of communicating with clients, candidates and secondary agencies. Like the mail merge system you can send groups or individuals emails or sms messages using substitutable merge fields and have standard attachments linked but unlike the mail merge system notifications uses HTML emails which can be branded for your agency and include images (without the need to use Word). It is also possible to create Outlook Appointment direct from the notification, particularly useful for interviews or external client meetings.
The creation of a template is all that is required to 'switch on' each notification mechanism, the templates require System Administrator set up. In some cases a Notification will appear automatically, in others they are called by the Notification Icon  .
.
Where notifications can be sent from
Below are the locations that notifications can be sent from, please note they will need to be set up by your System Administrator:
Desktop
Progress Due for Action - tick to select the records then use the send notification button to send the notifications, useful for advising groups of candidates their cv has been submitted or a position has been filled.
Interview View - tick to select the records then use the send notification button to send the notification. Can be used to send reminders about upcoming interviews or advise candidates they have been unsuccessful.
Contacts
Company Contact selector - ideal for contacting groups of client contacts that you maybe haven't spoken to for a while to make contact, simply run a search using the criteria ctrl click the records and use the notifications icon to send the notification. This button can also be used to contact new client contacts that have been added to the database and the notification can be set to automatically pick up marketing material for your agency.
Company Contact record - use the notification icon to provide one to one information such as Terms of Business for newly onboarded clients.
Person
Person Selector - Run a search then ctrl click the relevant records and use the icon on the person selector to send things like registration packs or welcome emails.
Person record main page - use the notification button to send one to one communications with a candidate.
Person record Documents and Compliance Documents views - notifications can be used to send documents, compliance documents or document packs to candidates or clients. For more information on how to do this please see How to send a Document Pack.
Person Search - use the notification button to send an email or text to a candidate to ask if they are interested in the positions returned by the search.
Vacancies
Vacancy Selector - run a search to send individual or multiple emails (or sms messages) e.g. vacancies that are in a state on 'on hold' and use the notifications icon to contact them all at once to enquire whether the vacancy is still active.
Shortlist - used to send notifications dependent on the progress status of the candidate e.g. send interview confirmations to the client and the candidate, advise candidates if their CV has been submitted or if they have been unsuccessful. The template can be set to pick up documents like interview tips or client information from the company or vacancy record. It is also possible to set up the interview notification to send a diary appointment to the recipient so they can add it to their calendar.
From version 2.21.8+ if there are multiple candidates in a short list e.g. that have been invited to interview and their progress status reflects this, they have an interview date and time it is possible to send all interview information to the client in one notification (using the progress merge fields) rather than having an email per candidate going to the client.
Temp Desk
Ctrl Click to highlight the records you want to contact and use the notification button to contact them by email or sms.
Vacancies - If you work on a shift desk when you are filling shifts you can use notifications to contact potential candidates to check their availability. Shifts can be confirmed or cancelled using notifications using the confirm shifts button. For more information see Shift Confirmations.
Temps - use notifications to contact temps regarding whether they are interested in a position or to check in and see how things are going, filter or do a postcode filter first to find the relevant records.
Availability - contact candidates who have no availability entered or no availability on a particular day to keep the temp desk up to date and assist with filling positions.
Placements - if end dates are approaching you can contact vacancy contacts to enquire about whether any extensions are needed.
Timesheets - Provisional timesheets, ideally used for contacting candidates who have not yet submitted their timesheets for processing or need to be advised that the cut off for getting them in is different this week e.g. for Christmas. 2.23.1+ send to either the vacancy or site contact.
Expiry dates - contact multiple candidates at a time to provide up to date right to work documentation, candidates can be contacted in advance of the expiry date being reached to ensure they remain available for work.
Compliance - similar to the expiry dates view you can use notifications to contact multiple candidates who are not yet compliant to remind them of the documents needing to be seen before they can be made active.
Vacancy Shifts
Placements
Shifts
Querying - you can use notifications to see if groups of temps are available for individual or blocks of shifts. Ctrl click the records you want to contact and use the sms/Email button.
Confirming and Cancelling - for more information see here
Timesheets
Provisional Timesheets - useful for advising of changes in dates for getting timesheets returned e.g. Christmas or bank holidays
Favourites
Notifications can be sent to groups of selected records from the Favourites screen.
Users can now send Bulk Notifications from certain areas within IQX. This means users will be able to to send the same notification to multiple people in one go with the relevant attachments.
Bulk notifications can be sent from the Person Selector, Company Contact Selector, Vacancy Selector and Placement Selector as well as the following Temp Desk views; Vacancies, Temps, Placements, Vacancy Shifts, Timesheets, Expiry Dates and Compliance.
Using Notifications
It is possible to have more than one template for each notification type, if more than one has been created the notification will open and the user will need to select the template they want to use. Clicking on the drop down arrow will show the available templates and whether they will be sent by sms or email.
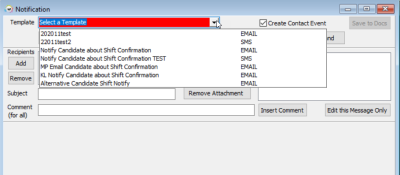
If only one template is available it will automatically load ready for the user to check and send.
The aim of notifications is to speed up standard contact and recording of contact events as attachments can be picked up automtically, merge fields can be used to personalise the messages with candidate/client names, shift or interview dates and times etc and contact events logged without the user having to do anything. However it is possible to make amendments to individual notifications if required.
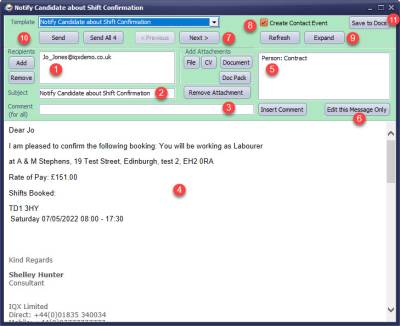
The email address is the default address of the record connected to the notification, it can be changed here if required using the Add and Remove buttons. It is possible to search for other email addresses in the database by clicking Add then selecting the elipses button. Users will be given the option to add the email just to the notification they are on or all notifications.
The subject is picked up from the notification template but can be amended here.
The comment will be added at the end of the template message on every notification.
This is the template text including any merge fields with the users email signature attached.
Attachments can be set by the system administrator to be picked up automatically either from a directory or a document of a particular type on a record e.g. company information or contract. Additional documents can be added at this point using the File, CV or Documents buttons. 2.22.2+ if the company you are sending documents for is linked it is now possible to pick up documents from all linked companies not just the one you are on.
If you want to add a note to just one of the notifications use this button, you can use the buttons at the top (7) to scroll to the one that you want to add the note to.
The Previous and Next buttons allow you to scroll through each notification to check the details before sending.
If set up by the system administrator contact events can be automatically logged when the notification is sent, just ensure the box is ticked.
The Expand button enables users to access any linked record e.g. candidate, company or vacancy. Helpful if you just want to check a quick detail before sending.
Users can choose to send notifications either one at a time using the Send button or all at once using the Send All button.
If you require to keep a PDF copy of a notification for audit purposes click the Save to Docs button, if the location you are sending the notification from has links to more than one place e.g. placement or vacancy you will first be asked to select where they want to save the file before seeing the usual save file window. The file will then be saved to the documents view of the relevant record.

