Temp Desk
If you are a Temp consultant, this view is where you will spend most of your time. Almost everything can be done from this view in relation to Temp vacancies.
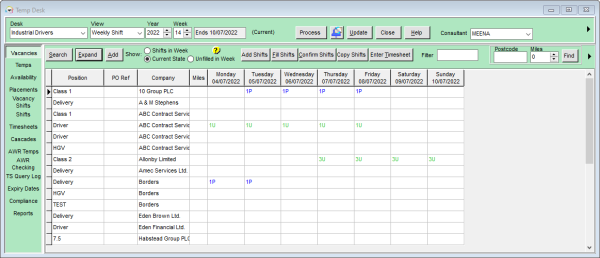
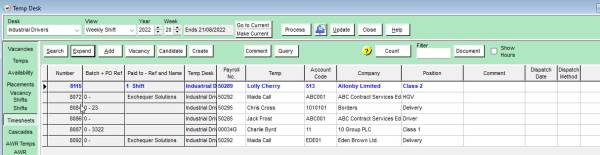
Vacancies
The Temp Desk will automatically open on the Consultants default Temp desk. You can select a different Temp desk from the drop down menu in the top left of the window. From this tab there are several things you can do:
- Expand the Vacancy
- Add a new Vacancy
- Search for a Vacancy by the Company/Client name
- Add shifts to existing Vacancy
- Fill shifts for vacancy
- Confirm shifts - this will also send out a notification if you have one set up.
- Copy shifts
- Access the Timesheet for a candidate
You can also filter the Vacancies by those that have Shifts in the week, are in a Current, or have unfilled shifts in the week.
Temps
In this tab you can view all the Temps for your selected desk, and see what vacancies they are booked into. If you right click on the cell a small window will popup showing you more details about the booking. You can access the Person record and the Vacancy record from here by clicking on the option.

Other actions you can perform from this tab are -
- Enter Availability or Unavailability
- Enter Holidays
- Add shifts
- Book Shifts
- Confirm Shifts
- Access the Timesheet
If enabled by your Agency, you can also set the distance in miles from the postcode (vacancy)
Availability
This view shows you the Candidates Availability, Unavailability and Holidays on your chosen desk. You can view the next month or the previous month. You can also change the candidates status, filter by has availability and NOT working this week. You can also expand the Candidates record from this tab.
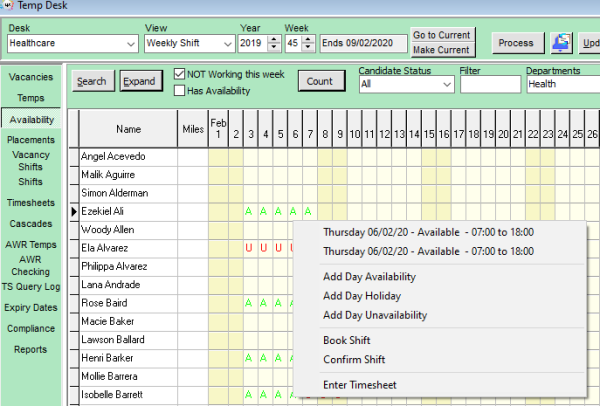
By right clicking on any populated cell, a new window will pop up giving you more details. From this window you can also add Availability, Unavailability and Holidays. Book shifts, confirm shifts and access the timesheet.
Placements
refers to:
temp desk form → placements tab
This is where you manage your group of placed candidates. All contacts can be made and recorded from this view.
In order to save entry time a Placement is not required until a first Timesheet is Completed – IQX takes care of it in the background. This means that looking at the Placement list does NOT show who is working in the week.
If a Placement is needed because a Temp is getting different rates to the Vacancy then from the Vacancy it is possible to early-create the Placement from the shift view by clicking the Placement/Rates button. Do not use the normal method of adding a Placement as it will not see the shift links.
2.22.2+ If set up by your system administrator unavailability entered for a contract temp the reason is now visible onthe Placements, Timesheets and Availability views.

The Unavailability reasons will also show on the timesheet in place of the hours, if Show Hours is ticked.

Note Timesheets are generated from this list so it is important to only have current placements on this list.
See also
What do the colours mean?
Vacancy Shifts
Here you will see all the filled shifts in the week for each vacancy on your chosen desk. It also shows you the name of the temp that is booked into the shift and the shift description and times. This information can be viewed full by rolling your mouse over the cell.
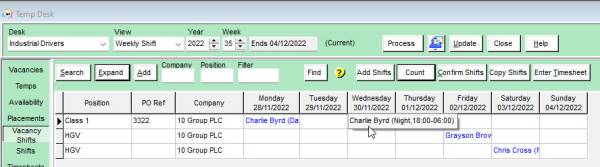 From this tab you can perform a count of the vacancies, confirm shifts, copy shifts, and enter timesheets.
Shifts
When you click on this tab a new window will open detailing all the shifts for the week on your selected desk. From here you can view each shift in more detail > move the arrow to the shift and all the details will be in the bottom section of the window. You will see several buttons to the left of this section detailing all the tasks you can carry out from this view. This includes, filling shifts, expanding the vacancy, cancelling shifts, expanding the Temp record, cascade, expanding the timesheet, confirm, move shift.
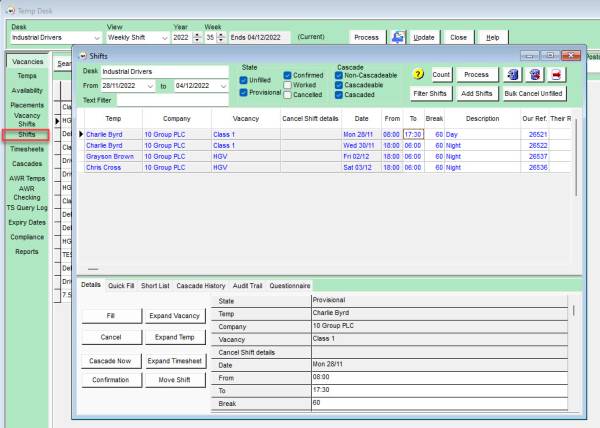 On the main window you can filter the shifts to narrow down what you are looking for. Add shifts and bulk cancel any unfilled shifts
Timesheets
This is where you can view your timesheets, create timesheets or add new ones. You can also directly access the Vacancy Record and Person's Record by clicking the corresponding buttons in the top bar menu.
By expanding up the timesheet you can complete it ready for invoicing.
AWR Temps & AWR Checking
The Temp Desk has two new views - AWR Temps and AWR Checking. These have to process a LOT of information so can be slow to load.
AWR Temps
This view shows the current roles for the Temps registered with the desk.
The default view is to check the roles that have 11 weeks of qualification. This can be changed to look at less weeks of qualification or to look at the gap since the last timesheet.
After six weeks of gap, the role reverts to Unqualified State with a Qualifying count of 0.
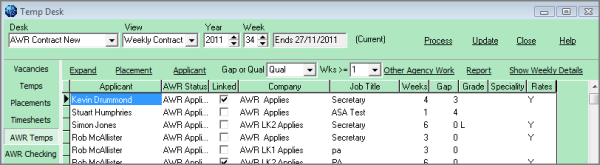
The example is showing candidates with at least one week's qualifying but in practise it should be used to see who is coming up to qualifying to ensure all the details are set up and correct.
The Show Weekly Details button will list the events that count towards qualifying and pausing the gap. Other Agency Work can also be entered from here - make sure to choose the correct role that it is to be entered for before clicking the button.
AWR Checking
This view shows the AWR information for Companies, Vacancies and AWR Roles (which can encompass several Placements). You can filter to just one type. The dates refer to the checked date and information can always be updated from this view.
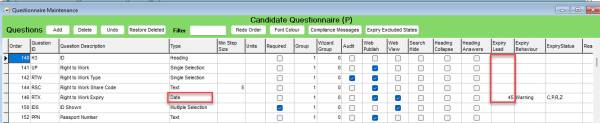
Expiry Dates
The Temp Desk has an Expiry View which shows all Date Criteria/Skills/Questions that have been set up with a number of 'Lead' days to expiry. This should be used to initiate bulk communications with the Temps needing updating. In order to appear in this view a question needs to be a date question and have a lead time entered:
Expiry Dates View Features
If the date is in the future by more days than the lead number, the date is in Black
If the date is in the future by fewer days than the lead number, the date is in Blue to show it's nearing expiry.
If the date is in the past, the date is in Red to show that it has expired.
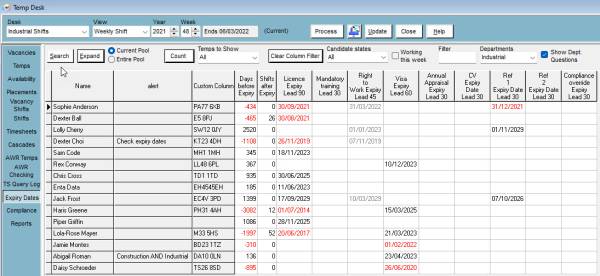
To see just the Candidates who have a date due to expire or already expired click on the 'Temps to Show' and select Expired and Expiring from the dropdown.
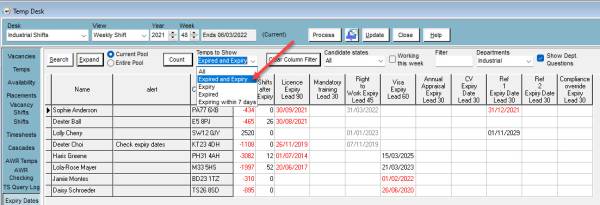
To filter to just one type of Expiry Date - e.g. Visa Expiry - click on the column header. Only Temps with a date in that column will now show. All their other dates also remain in view.
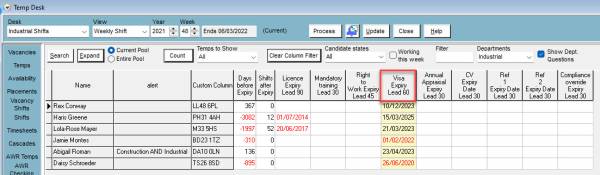
To clear this selection click on the Clear Column Filter button.
To include non-current Temps such as pre-registered or not active select the radio button for Entire Pool.

To search for a Temp by name you can use the Search button. A window will pop up where you can search for the Temp by name.

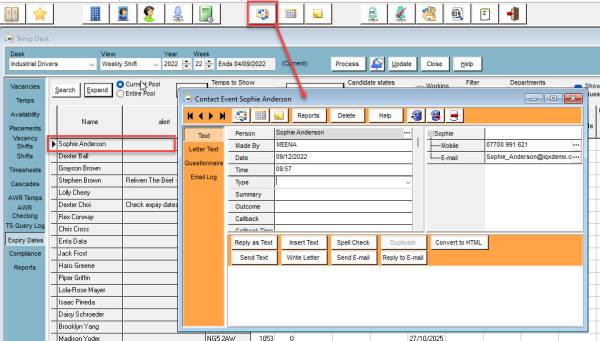
To make an individual contact event to send an email or write a letter. Click on the line once to select the Temp - then use the Make Contact Event button or F2 to bring up the Contact Event window.
To send emails or print letters in bulk - Mail Merge
Use the Process button to take all the visible records to the Person Selector or select by holding CTRL and click on the required records to process only the selected records to the selector.
From the Person Selector use the Mail Merge view to write the email/letter to the Temps.
Compliance
If compliance domains are set up by the Agency a summary of the states for all Temps in the Temp Desk can be seen on the Compliance view.
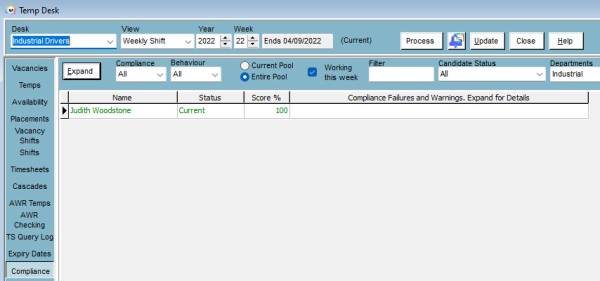
By default you will see Temps that are working in the week, but you can see all Temps in the desk by unticking the Working this Week box.
Expand will open the Temps record. If any expiry dates are expired or expiring, you will get a list of these in the final column. Again from here you can make individual contact events or process Temps to send a Mail Merge.
Reports
Here you will find all the reports that are linked to the Temp Desk. These are usually reports that require their data to be pulled from the timesheets or shifts. To run the required report, click on the line once to select then click on open. The report will either prompt you to make a further selection i.e. a date range, or it will open immediately using the information from the week you have selected on the Temp Desk.