How to Add a New Candidate Record
There are a few different ways you can add a new candidate.
- NEW button on the Person Selector
- FAST NEW button on the Person Selector
- From a CV
- Directly from the IQX Inbox
Using the NEW button on the Person Selector
Click on the People icon on the toolbar to open the selector form.
Click on the New button, this will open the Person Details wizard to be completed.
There is a Load CV button available when adding a new candidate. This will allow you to browse to relevant folder and load CV from word and parse details etc. If you have started the registration from an open CV using the macro the CV will be loaded, ready for parsing.
You cannot edit the lines that are in grey, as they will be generated from items entered in the expanded group of fields. Move to the next line by tabbing, this will auto-fill fields. The information that you are asked for depends on what has been requested and set up by your Agency, but should include all of the following:
| Name | This will be generated as you enter the names in the Surname & Forename fields. |
| Surname | Candidate's surname. |
| Forenames | Candidate's forename. |
| Full Name | This is generated from the names that you enter. |
| Salutation | This is generated from the names that you enter. It is used for letters and e-mails. |
| Keyname | This is generated from the names that you enter. |
| State | This will default to Agency initial applicant state setting. |
| Personal | Gender, Date of Birth and NI Number are required for payroll |
| Marketing | If the person has agreed to Marketing change to Subscribed |
| Consultant | Defaults to User entering. Select a name from the drop down list if to be changed. |
| Registered | This is set to today's date |
| Number | This is the candidate's number that is generated by IQX. It is initially empty until the wizard is finished. |
Once you have entered all the key information, click on the Next button.
The wizard is made up as follows, but can be customised by each Agency to only include the pages that are relevant to you. For more information please contact IQX Support.
| Main details | Name, Address, Phone and Email, Essential Information |
| General Questions | Universal data to be kept for the record. |
| Payroll Information | Tax Method and Details, Pay method and details. Optional if the Agency does not complete at initial stage. |
| Department | Defaults to the User’s Department. This page is optional. |
| Perm and/or Temp | Defaults to tick if the User has the Perm and/or Temp roles. Optional. |
| Temp Desks | Defaults to all in the Divisions the User can see. Optional if the Agency does not assign Temp Desks until compliant. |
| Department Questions | Departmental specific data to be kept for the record. |
Using the FAST NEW button on the Person Selector
If enabled by your Agency there will be a Fast New button on the person selector which opens a simplified version of the new person wizard which is a single page form.

This single page registration form will enable consultants to quickly add records while the candidate is on the telephone ensuring the data is entered onto the system and can be found and searched for.
2.21.11+ CV Parse option was added to the Fast New button.
2.23.1+ If turned on in General Settings Source will show on the Fast New Wizard.
Adding a Person from a CV
Open the CV in Word and use the  macro button that should be installed on your PC by your Agency.
For Word Versions before 2007 the IQX Icon will show on the menu bar on the right.
For Word Versions after 2007 there will be an extra Menu item called Add-Ins and the IQX Icon will be in that view.
macro button that should be installed on your PC by your Agency.
For Word Versions before 2007 the IQX Icon will show on the menu bar on the right.
For Word Versions after 2007 there will be an extra Menu item called Add-Ins and the IQX Icon will be in that view.
OR drag and drop the CV from desktop into a blank area of IQX (IQX can handle both word and pdf CVs).
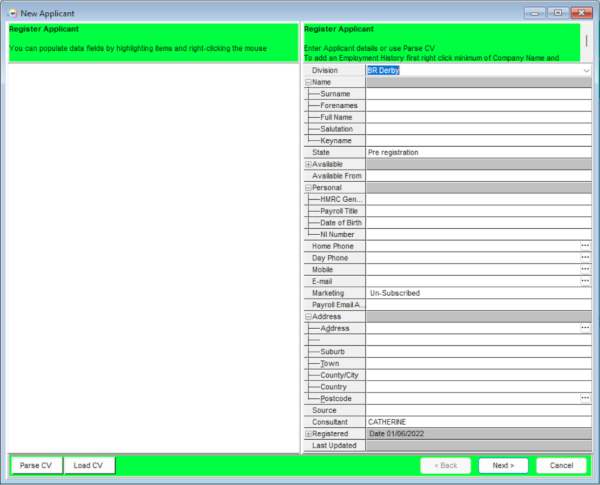
When using the macro button or drag and drop method, the Person Wizard will be opened with the CV in plain text on the left panel. You can then click on the Parse CV button underneath the CV text and this will auto populate the main fields with the relevant information. There is a Clear Parse button if the data is unsuitable for parsing.

Populate other fields by highlighting the text on the CV, right clicking the mouse and selecting the destination field.
The following fields can be populated in this way - Surname, Forenames, Full Name, Salutation, Postcode, Country, County, Town, Rest of the address, Date of Birth, Gender, Home Phone, Day Phone, Mobile and e-mail.

The right hand side will show the data as it is added.
Thereafter use the Next button and work through the wizard as usual.
You will have the CV on display to help fill in the Questionnaires.
From version 2.20.9 onwards it is also possible to import History for a candidate when you are parsing their CV or highlight the information, right click and select Employment History from the menu. You can link to companies that already exist in IQX and those that don't.

Directly from IQX Inbox
You can now load a CV into the New Person wizard directly from your inbox in IQX. From here you can parse the CV and create the new person as you normally would from a Word CV or New button. The email has to be visible in your inbox in IQX (in the inbox limit set in IQX). The CV has to be in either TXT, PDF or Docx format. To do this follow these steps.
Find the email that has the CV you want in your IQX inbox and click on Expand.

Click on the required CV / Document to select it.
Once you have clicked on the CV to select it click on the ‘Add New Person’ button.

This will load the CV text into the New Person Wizard and allow you to Parse the CV and create the new person.
Back to Getting Started