This is an old revision of the document!
Timesheet Image linking and completion
Timesheet images can be linked to an IQX timesheet so that the image can be added to the invoice PDF for printing or sending by email.
- Timesheet images - arriving by fax or email.
- If the timesheet image is for all the shifts in the week for that Temp and site - save to the N:/IQXTIMESHEETS folder with the name as front of file name e.g. 9288913y598u092509.pdf should be saved as something like:
- JoeBloggs9288913y598u092509.pdf or
- Bloggs9288913y598u092509.pdf or
- Bloggs ward x week52.pdf for example, choose a format that suits.
- If the timesheet image is for just one of several shifts in the week for that site, or contains images for other sites too - save to the N:/IQXTIMESHEETS Merge or Split folder, again with at least the name in front of the filename so they can be merged or split as required.
- Timesheet images arriving in paper form. Scan and save to the N:/IQXTIMESHEETS folder.
Merge or Split the images in N:/IQXTIMESHEETS merge or split using the PDFill PDF Tools, saving the results in N:/IQXTIMESHEETS and deleting the originals so that the merge or split folder is empty.
Using the images to complete timesheets in IQX
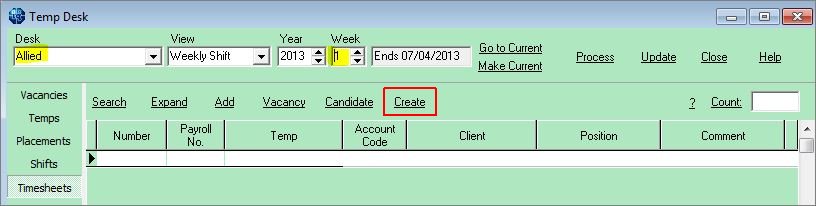
- Open the Temp Desk form,
- Select the first temp desk,
- Check the week is correct,
- Select the Timesheets view and use the CREATE button to create blue provisional timesheets from the booked shifts.
- Repeat for each Temp Desk.
- Open Timesheet Image Link from the Accounts menu. DO NOT maximise.

- Select the Temp Desk
- Select the Year and Week
- You can include previous weeks to catch late Timesheets by using Prev Weeks.
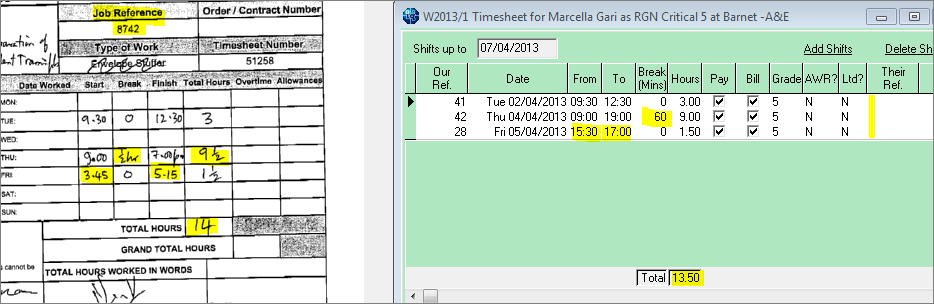
Look at the image on the left and find the Timesheet from the list on the right to match.
- Use the Link & Open button. This will Open the Timesheet for completion. Drag to right so that you can see the Image to read the Shift details. The Image will now be shown on the Linked view instead of the unlinked. You can move the central margin to widen the image.
- Check the shift start and end times and the break againt the timesheet and edit the shift if required.
- Enter the client shift reference in Their Ref (if there is none required a full stop will do).
- Check the total hours at the bottom with the image - if OK click NEXT.