Release 2.3.5
Users
Separation of Compliance Docs and Docs
This feature separates out Compliance Documents by document type.
To access this feature in the Person form, scroll down the sidebar.
Compliance documents can be created in:-
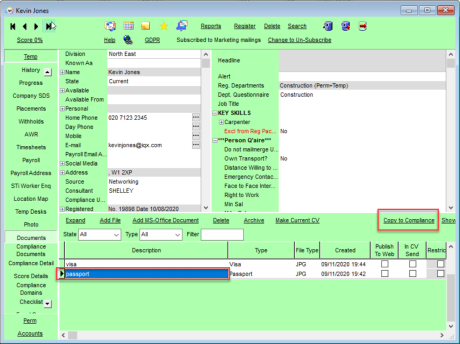
Person form – Documents – Select document - Copy to Compliance OR Drag a document into Compliance Documents.
Select all or part of the document - Save Compliance - Select Document Type – Complete Compliance document questionnaire.
Compliance documents are saved as pdf documents. A pdf copy of the compliance document will be saved in Compliance Documents.
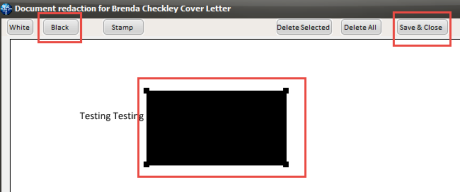
Compliance documents may be redacted. Select the document – Redact – Select the Black or White button - Click and hold down the left mouse key to drag a square over part of the document – Save and Close.
Redacted documents have a file type R in Compliance Documents.

This feature may require System Administrator setup.
Branding
It is possible to set up Automatic shift notifications that send by email, SMS message or print, a confirmation of shifts to clients and/or temps.
These are set up as templates, and functions are created to specify the use, dependent on agency requirements. It is possible to have multiple brands and styles and behaviour is specified to identify which brand, template and method of sending is to be used in which circumstance (for example in the simplest terms which template is used when sending to a temp and which is used when sending to a client).
Documents and reports can also be sent as attachments to emailed confirmations.
As it is fully configurable based on agency requirements, this is a chargeable function and set up costs are based on time. Please contact IQX Support for a quote, demo, or to discuss your requirements.
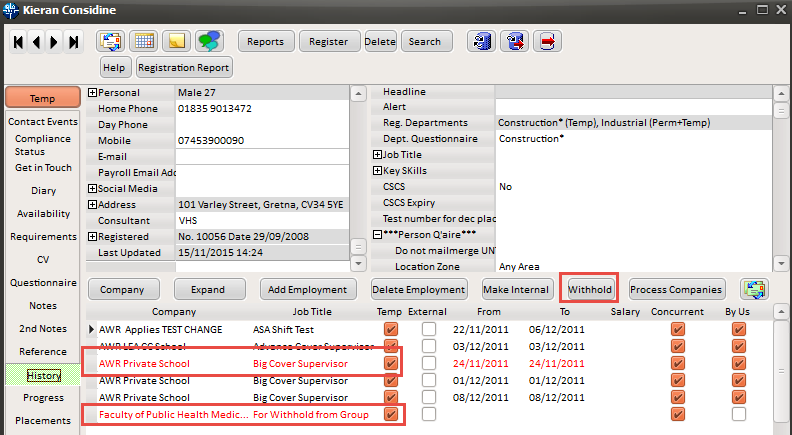
Enhancement to Withhold from Group to clarify which are not employments
If a company is in a group and the Withhold button, on the History view, is used there is an option to Withhold from Group. If this is accepted the group companies are listed in the employment with the job title ‘For Withhold from Group’.
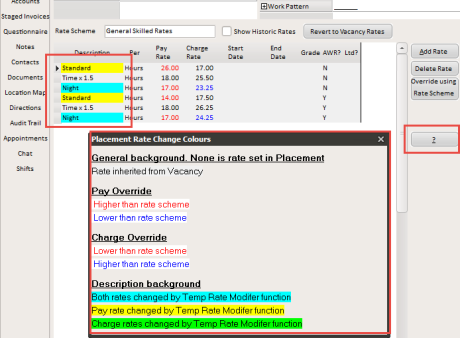
Placement Rate Colour Legend to highlight TempRate Modifier has been used
A Placement Rate Colour legend has been added to highlight when TempRate Modifer has been used.
Access this feature on a Placement - Rates view - Question mark button.
Recent Records be able to look via a date range
Recent Records have been enhanced to allow searching between a date ranges.
To access this feature Press Ctrl + F2 or Select – Recent Records and insert the date range under consideration.
Insert Text and File, Division menu list size switch
A switch has been inserted so the menus do not stretch beyond the screen, if the list grows larger than a screen depth.
This feature will require System Administrator setup.
Documents: adding, archiving and managing
In Person, Placement, Company, Vacancy and Progress filtering has been added to the document view.
This feature allows searching and filtering of Document State and Type along with key word searching in the description.
In addition, the sort order has been amended to place any archived records at the bottom of the list.
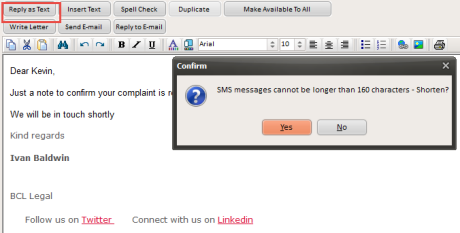
HTML Email - Plain Text Reply Method
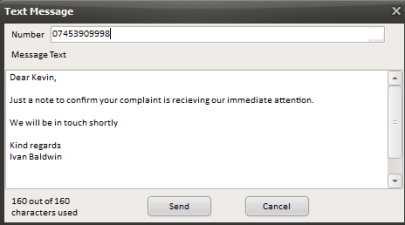
An option to reply to an HTML email in a plain text SMS message.
When replying to an HTML email, write or insert text and then use the Reply as Text button to send the text as plain text. The Contact Event will be saved as HTML.
Add to Diary List Option to Multiselect and Delete
This feature enables multi-selecting and deletion in Diary List. To use this feature - Desktop - Diary List – Highlight the entries to be deleted using the mouse and the Ctrl key - Delete - Confirm.
This feature requires System Administrator setup.
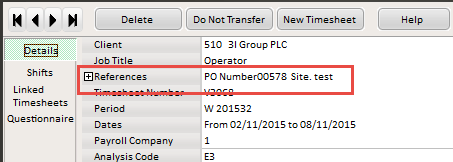
Show Site Name on completed Timesheet
The ability to show the site name on a completed timesheet has been added.
Once there is a completed timesheet, select a timesheet, it will show in the References section.
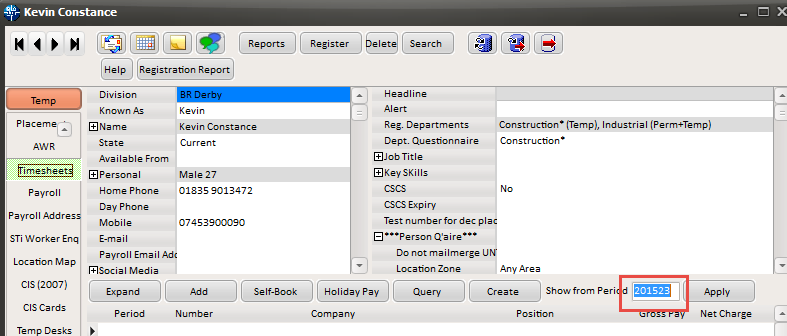
Add Period Filter to Timesheet View - as in Vacancy Timesheet View
The facility to filter timesheets by period in Vacancy has been extended to filtering timesheets in Person. This reduces the time for the form to load.
View this feature via the Person form - Timesheets – The 'Show from Period' box defaults to showing the last 10 weeks. To see more enter the starting week and Apply. Display will change to show only those timesheets from that period.
This functionality requires System Administrator setup.
iqxWEB
Visibility of a Person Record being registered as an iqxWEB User
This feature identifies Candidates and Contacts who are enabled to use iqxWEB.
View this feature by selecting a Person or Contact and finding the iqxWEB icon. A red tick indicates the Person or Contact is an active iqxWEB user.
System Administrator
Audit Trail side bar button location moved to bottom of list in the Person form
In Person records the Audit Trail side bar button has been moved to the bottom of the list.
Visibility of this button can be set up via Maintenance – Users – Roles - Role Group SUPERUSER - Can see Audit Views without Tech Support Role
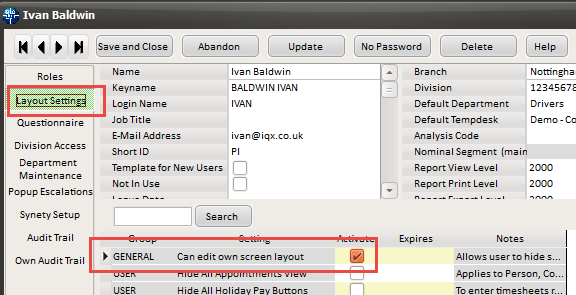
and Maintenance – Users - Layout Settings - Role Group – General - Can edit own screen layout.
This feature can be viewed via the Person form – Scroll down the side bar to the bottom of the list.
Add Period Filter to Timesheet View - as in Vacancy Timesheet View
The facility to filter timesheets by period in Vacancy has been extended to filtering timesheets in Person. This reduces the time for the form to load.
View this feature via the Person form - Timesheets – The 'Show from Period' box defaults to showing the last 10 weeks. To see more enter the starting week and Apply. Display will change to show only those timesheets from that period.
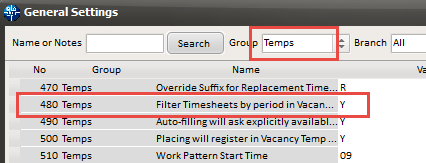
To set this up:- Maintenance – General Settings – Group Temps – No 480 = Y – Save and Close. This feature uses the same switch as vacancy timesheet.
Separation of Compliance Docs and Docs
This feature separates out Compliance Documents by document type.
To set a document type as compliance you need to tick the Compliance checkbox in Maintenance – Agency Setup – Document Types
By default it will be associated with all departments but a selection can be made available using the Department button. In addition, questions can be associated with a compliance document by using the Questions button. When a compliance document is added the questions will be displayed.
To access this feature in the Person form, scroll down the sidebar.
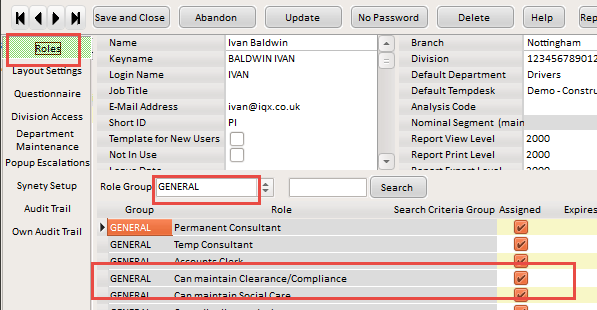
To setup compliance views:- Maintenance - Users - Role - General - Can maintain Clearance/Compliance
and Maintenance - General Settings - Settings - No. 1810 = N
Branding
It is possible to set up Automatic shift notifications that send by email, SMS message or print, a confirmation of shifts to clients and/or temps.
These are set up as templates, and functions are created to specify the use, dependent on agency requirements. It is possible to have multiple brands and styles and behaviour is specified to identify which brand, template and method of sending is to be used in which circumstance (for example in the simplest terms which template is used when sending to a temp and which is used when sending to a client).
Documents and reports can also be sent as attachments to emailed confirmations.
As it is fully configurable based on agency requirements, this is a chargeable function and set up costs are based on time. Please contact IQX Support for a quote, demo, or to discuss your requirements.
Maintenance – General Settings Form – Search moved to the left
In Maintenance - General Settings. Search has been moved to the left of the form to provide an initial search focus and a description box has been added.
Convert Boiler Plate Text
There is an extension to the webservice CONVERT_BOILERPLATETEXT with new parameters added.
The existing parameters were ID1, ID2, html & Text. Type, ID1 & ID2 can still be used (left in for any job using them) but new parameters have been added:-
person, vacancy, placement, progress, company, employment, shifts, brand, consultant, contactevent (not with ID1 & IQ2 or type)
e.g. <StaticFunction service=“CONVERT_BOILERPLATETEXT” person=“{bpt_personid}” html=“No” text=“{BPText}”/>
Note in all of these examples the text parameter MUST come last.
Menu list size switch
A switch has been created to force File, Divisions and Insert Text - Boiler plate menus so they do not stretch beyond the screen.
This function is enabled via Maintenance – General Settings – Group - Settings - No 1850 and inserting the number of items required before an additional column is started. Note if the value inserted is below or equal to 20 this function will keep the list as a single column.
Ability to Block Extra States of Clients
A new switch has been added to allow the blocking of certain Client States from the pick lists when adding a new vacancy.
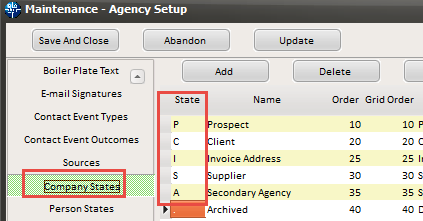
Then access – Maintenance – General Settings – Switchable Fields – No 2800 and insert the Company states that will be blocked.
The Company State codes are in Maintenance - Agency Setup - Company States.
Changes to JobRunner Commands <Set Variable> and <If>
In JobRunner <SetVariable> will now allow regular expression substitutions and <If> will do regular expression matches.
Refer to <SetVariable> and <If>
Add to Diary List Option to Multiselect and Delete
This feature enables multi-selecting and deletion in Diary List. To use this feature - Desktop - Diary List – Highlight the entries to be deleted using the mouse and the Ctrl key - Delete - Confirm.
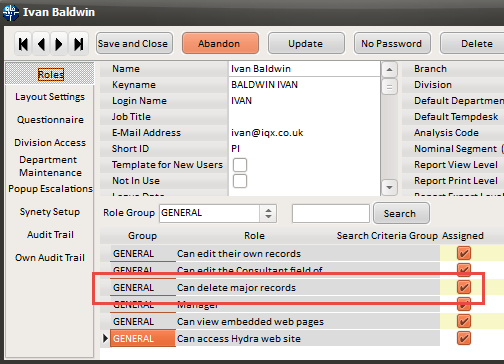
To enable this feature will require the ability to delete major records - Maintenance - Users - Roles - General - Can Delete Major Records – Tick.
Along with the setting to delete in bulk on Diary List. - Maintenance - General Settings – Group - Switchable Fields - 2850 - Delete in Bulk on Diary List = Y.
If All Users are selected but the User has been restricted from deleting other users reminders the Delete button will not show.
