Table of Contents
Adding a New Vacancy
Temp Vacancies can be added from Temp Desk, Company record or from a Contact Event to a Contact.
Perm Vacancies can be added from the Company record or from a Contact Event made to a Company Contact.
From a Temp Desk
Open the Temp Desk the vacancy is to be managed from.
On the default view use the Add button – a quick wizard will open.
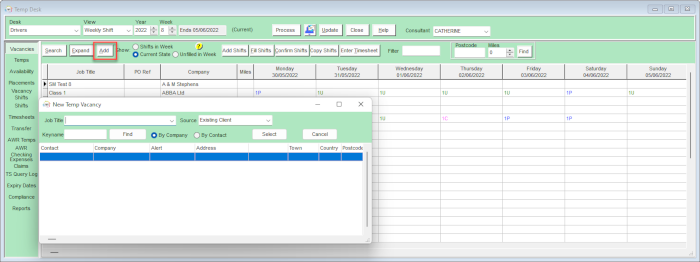
Enter the job title and change the source if the default is not accurate.
Select the client from the default list showing (will show if you have a stored selection of contacts that is called 'Temp Regulars' (see Hints, Tips and Shortcuts, Temp Desk Regulars), or enter the keyname of the client or contact and search for them.
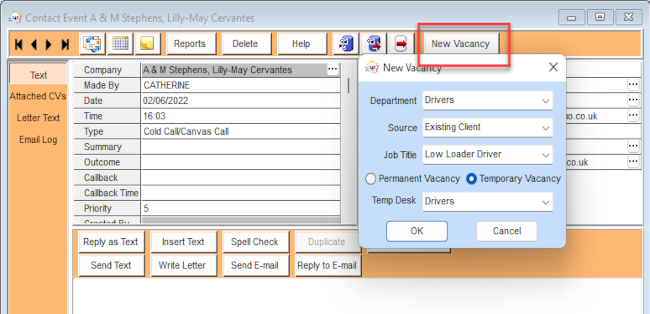
From a Contact Event
A Contact Event made with a Company Contact has a button to the top right of the screen 'New Vacancy'. This will open a new vacancy form
From a Company Record
Ensure that the contact is selected and add a vacancy from the vacancy view this will open a New Vacancy form.
New Vacancy Form
Once the new vacancy form is open, enter the relevant information:
- Select the department
- Enter or select the job title
- Select whether it is a temporary or permanent vacancy
- If it is a temp vacancy then select a temp desk to add it to.
If your agency is set up to use the vacancy wizard it will open at this stage and you will be prompted to enter relevant information and click through the screens. The vacancy form will then be created showing the relevant views depending on the type of vacancy (perm/temp/contract/shifts).
If the vacancy wizard is not set up, the vacancy form will open straight away and you should add the relevant information eg:
- Expand the Dates section and check the Start Date and End Date.
- Enter the notes into the top right section.
- Make a Contact Event to record how the vacancy was received. If you originally added the vacancy from a contact event this contact event will be saved against the vacancy already.
Temp Vacancies
Select the Rate Scheme or enter the rates manually if they are not available in the drop down selection. Add AWR rates if you have them at this stage and they are not already written in the rate scheme. See AWR Vacancy view for more details.
| Vacancy screens | |
|---|---|
| Position | Position or Job Title |
| No. of Posts | The number of posts needed to fill this vacancy |
| Their Ref / PO Number | The Reference of Purchase Order from the client. Will also control how timesheets are grouped on invoices. If this is entered after a Placement has been made, the Placement must also be updated, as it will have picked up blank fields |
| Dates | Expand and enter the Start date and, as appropriate, Finish date and Expiry date. These can be edited at any time |
| Salary | For Perm vacancies - add the base salary rate. For a range use the Questionnaire Item below for max salary |
| Pay/Charge | For Temp vacancies - this will be filled from the Rates tab |
| Status/Codes | Shows the state of the vacancy, internal reference and field for a Contract ref. Expand to change or edit |
| Department/Consultant | Shows the Department, Consultant and Temp Desk (if appropriate) that the vacancy is connected to |
| Notes | Use the notes field on the top right to enter the main information about the vacancy, so it is instantly visible |
Go back to Getting Started