Custom Grid Columns
Refers to Maintenance - Database Set Up - Custom Grids
As an Agency you can customise almost all of the grids in IQX, selector screens and grid views on records e.g. placements view on a candidate record. You can do this so users can see information that is important to your Agency at a glance. For example on the person selector you might want to see the date the candidate was last contacted or on Desktop - Current Vacancies you might want to see the answer to a vacancy question.
Custom Grid Columns are defined in Maintenance - Database Setup.

- Department: It is possible to have custom columns only showing for certain departments which then allows access to departmental questions. However, if the column should show across the board then setting the department to 'Default' will ensure this happens.
- Form: Relates to the form e.g. person or person selector.
- View: Relates to the view on that form the column is to be added e.g. the placements or vacancies view on the person form.
- List: To see a list of all of the custom columns you have set up change this filter to All. Otherwise it will show the columns set up for the selected form and view.
To add a new custom column select the Department, Form and View along the top then use the Add button to create the new column.
- Column Name: this is the unique ID given to this particular item in the database.
- Caption: this is the name the user will see on the grid.
- Position: this value determines where on the grid the column will show. Setting the value to - 0 will hide a field, a positive number to position it. The Position numbering may take some trial and error to position the field where you want it because it is affected by hidden fields.
- Column Type: select the relevant type from the drop down. If you want to return the answer to a question you would choose Question or if you wanted to return the data in a field in the database you would choose DataField.
- Data Type: select the relevant type data from the drop down.
- String Length: enter the length of the field value e.g. 25.
- Display Format: if you want a particular format enter it here e.g. dd/mm/yy or #,##0.00
- Descriptor: enter the code for the information you wish to return e.g. person.registrationdate will display the candidate registration date or P;OTS;person.personid will display the answer to a person question with ID OTS.
- Pick List: only used if column type is a combobox, contact IQX Support for assistance.
- Check Values:
- Sortable: tick this box if you want to be able to sort the column.
- Sort Expression: enter the value to be sorted and whether it is ascending or descending.
- Display Width: enter the value for the width of the column ensuring that it is at least as wide as the string length.
- Notes: double click the field and enter nnay notes relating to the column.
Some more technical details about the definitions above can be found here
Note: Although there is no limit to the number of custom columns you can add to a form it should be noted that each additional column added will affect speed, particularly in larger databases.
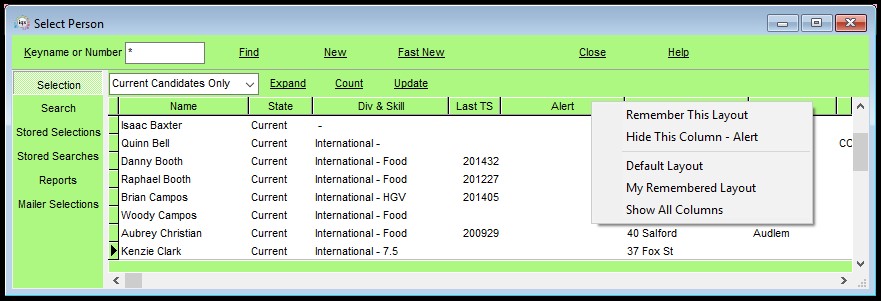
In addition to this there are a range of options available to users and admins by right-clicking the column heading of almost any grid . You can drag columns to move them, hide them by selecting that option on the right-click menu, remember your column layout, select the DEFAULT or a named layout, or Show All Columns.

More information on this feature can be found here