Quick guide for E-Timesheets
1 Create provisional Timesheet.
In IQX go to Temp Desk Timesheets and use the CREATE button to create the provisional Timesheets for that week. Provisional E-Timesheets will show in red bold and Timesheet number prefixed with an E.

2 Client and or Candidate edits and completes Timesheet online.
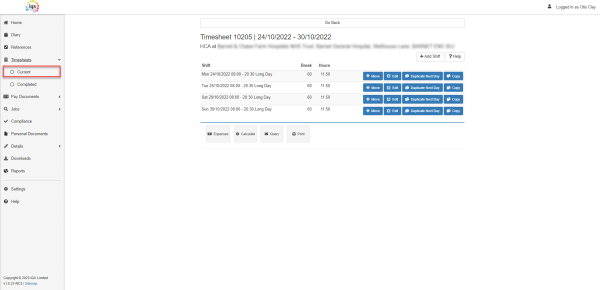
Once a provisional E-Timesheet exists, the Candidate will see the Timesheet online in the Current Timesheet section. It will show the Shift details for the shifts that they have been booked in to.
 The E-Timesheets' features can be switched so that you can enable or disallow features for Candidates and Clients.
If Candidates need to change any of these existing Shift details - ie. Start/End time, Date, Break Minutes or Reference details they can click the Edit button and make the changes then SAVE.
If they need to add extra Shifts there are few options for this:
- Copy which creates a new line to then enter the relevant date, start and end times and reference details then SAVE.
- Duplicate Next Day will copy all the Shift Details and set the date to the day after the date of the Original Shift.
- Duplicate will copy all the Shift Details and set the date to the same date of the Original Shift.
If they have times showing for a day that they did not work then they can not include this Shift on the Timesheet, or they can use the Delete button which will also delete the Worked Shift on IQX.
The Candidate can also Move the Shift to a different Vacancy if it has been put on the wrong Vacancy using the Move button.
Once all of the Timesheet lines are showing correctly click the Calculate button (This button will not show if Candidate Right “TSAUTOCALCULATE” is selected) to ensure that all the pay lines are updated.
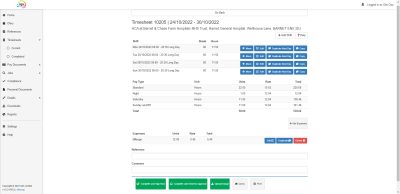
Timesheet Signing
If your Database is set up with Timesheet signing (System Administrator setup required) The Candidate can get their Timesheet Signed and Approved by Timesheet Authorisers.
The “Complete and Sign Now” Button will prompt the Candidate to pass their device to a Manager so the Manager can check the Timesheet Lines and Sign the Timesheet
The “Complete and Send for Approval” Button will allow the Candidate to send their to be Approved by a Timesheet Authoriser (2.21.11+ You can set Timesheet Authorisers within IQX. Rather than having to free type in an email address for who it should be sent to for authorisation they can now select from a dropdown box.)
Once the timesheet is signed you can see the Signing information on the TempDesk Timesheets View where it will turn pink and show more information and provide a pdf image
The Candidate can also Query the Timesheet using the Query button with pre-set Query reasons and adding a comment, this will get returned into the TempDesk under TS Query Log (System Administrator setup required)

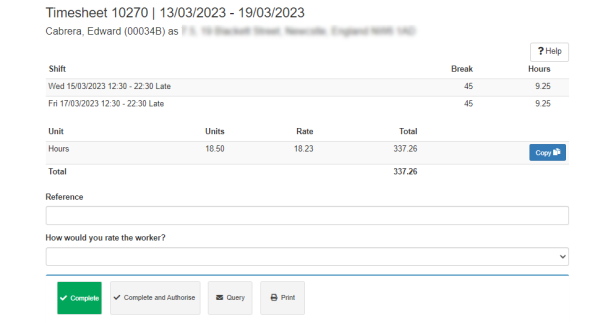
Client Authorising Timesheet
If the Client is set up they can Log in to their Portal and view Current Timesheets to be authorised.
The Client will have the option to Authorise the Timesheet and Query if the details are not as expected (Pre-Set Query Reasons to be populated in the TS Query Log in the TempDesk similar to the Candidate Query process).
If the Client Right “AUTOAPPROVETIMESHEET” is switched on once the Timesheet is Authorised, it will automatically Approve the Timesheet and Complete it within IQX.
Troubleshooting
- Client/Candidate cannot log in.
Ensure they are using the correct login details (ie. the email address that you have registered for them or the LoginID shown in the IQXNet User record accessed by pressing the website rights button from their person record) Double check spelling they are using etc.
If they still cannot login reset their password (by clicking the Reset Password button on Website Rights from their person record) and ask them to try again.
- The provisional Timesheet does not show as an E-Timesheet
There is certain information that must be entered to the relevant records to ensure E-Timesheets are enabled (see Enable Online Timesheets). Open the provisional Timesheet and click through each page remembering to set the units paid and charged columns to 0.00. When you get to the last page of the Timesheet, if you click E-Timesheet it will tell you what information is missing against the records.
Go back to IQXNet